- For medical professionals
- Doctor Connect App
Doctor Connect App
Doctor Connect gives St John of God Health Care specialists the ability to view patients’ live data, including:
- patient's hospital ward location
- review and acknowledge pathology results from Clinical Labs and radiology results from various providers ordered during a patient's hospital stay
- call any phone number available on the profile directly through the app
- access patient allergies and alerts
- view theatre bookings.
- ability to add patients into a specialist’s assigned patient list
- shared care doctor access to patient details
- view radiology images directly using the app (only for hospitals in WA using SKG Radiology).
Downloading the app
Apple / Android
- Select the App Store (Apple) or Play Store (Android devices) icon on your device
- Select Search and type in the (St John of God Health Care Doctor Connect)
- Select the app, select Install to download and install the app
- Once the install has completed select the icon to open the app
- If you have a installed a previous version to you will be required to update the new version of the Doctor Connect App from your Apple App Store (iOS) / Google Play store (Android)
- On opening the app ticking the checkbox to agree to the Terms and Conditions will then open separate popups where you will be prompted to agree to the End User Licence Agreement as well as the Privacy Policy.
- Once these are agreed to the app will prompt you to log in using your St John of God Health Care username and password
Instructions on how to install the NetIQ Advanced Authentication App onto your mobile device.
If you have any issues logging in after the upgrade or for general troubleshooting and feedback in relation to the app, please contact:
Tel: 1300 006 800 (Monday to Friday 8:00am to 5:30pm local time).
If you already log on to the St John of God Health Care network you will use the same username and password for this application.
If you do not know your user name or St John of God Health Care password, or for general troubleshooting relating to the app please phone IT Service Desk on 1300 006 800 (8.00am to 5.30pm)
Logging in
If not already done, install the NetIQ Advanced Authentication App to your mobile device and configure it for use.
Once setup open the Doctor Connect App and agree to the Terms and Conditions.
Use your username and password to logon to the app for the first time.
Select logon.
Accept the Authentication Request in the NetIQ Advanced Authentication App.
You will then be prompted to setup your PIN. (If looking to sign in with FaceID or Fingerprint follow the prompts on screen.
Setting up a passcode
Where your device asks for a passcode to be entered:
- Enter a four digit PIN code and select the 'tick' icon to confirm
- Re-enter your four digit PIN code and select the 'tick' icon to reconfirm
- Select 'continue' to enter the app.
The next time you log on you will be prompted for your PIN code. Where your device uses face recognition or touch ID, follow the prompts on your device for setting up the relevant log in details.
Forgotten passcode
If you have forgotten your PIN select FORGOT YOUR PIN CODE?
You will be asked for your network username and password and then prompted to setup your PIN again once the login details and the NetIQ Authentication Request are accepted.
Patients
![]()
- View expected admissions, current inpatients, discharged patients and patients in emergency
- Search for patients, create and save refined search lists
- When you click on a record you can view patient information including allergies and alerts, test results and contact details
Results
![]()
- View pathology and radiology results ordered during the patient's stay (see our FAQs for current provider list)
- Acknowledge a result and add a comment
Theatre
![]()
- View current theatre bookings using day/week display options
Settings
![]()
- Change your four digit PIN
More
![]()
- Select this icon to logout (note: the app will automatically time out after 10 minutes of inactivity)
After correctly entering your login details, you are taken to your default patients list. This screen provides you with real time access to the hospital's patient administration system for patients who are admitted under your care.
If the clinical situation requires you to access patient information for patients who are not admitted under your care in the hospital's patient administration system, you can search for a patient by URN or name using the magnifying glass icon. When you click on the patient's record you will be asked to accept a message confirming that you have a legitimate clinical reason to access the record.
Patients are grouped according to expected admissions, current inpatients, discharged patients and patients in emergency.
Filtering your patient list
- Select the edit function

- Select refine list
- Choose which filter/s you want to apply - you can select more than one
- Save your filtered list by using the slider and entering a name
- Select update list to save your changes
- Saved searches can be accessed via the edit icon
Make a default list
To make a patient list appear as your default view, select the 'make default slider'.
Add patients to your List
You can now search for and add patients to your list, and automatically receive their results; no need to waste any more time re-searching to access a patient’s information on multiple occasions.
To add a patient, access the action menu in the Patient List (3 dots in the top right of the screen) and select “Add patient”.
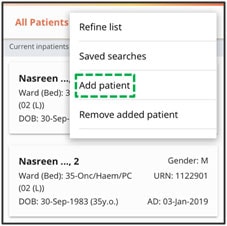
Then, search for the patient you wish to add, open the patient card, and click ‘Yes’ on the prompt at the bottom of the screen. Note: If you select ‘No’, this prompt will close and reappear if you go back out of the patient card and re-enter it.
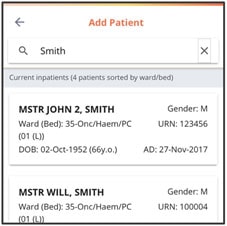
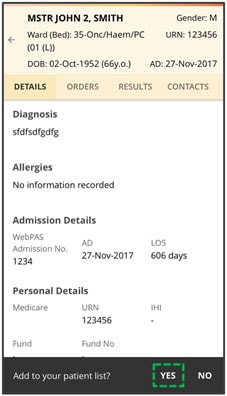
To remove an added patient, access the action menu in the Patient List just as you would to add a patient but instead select “Remove patient”. You will see a list of only your added patients; open the patient card you wish to remove and click ‘Yes on the prompt. Note: Only added patients can be removed from your patient list.
Default list changes for anaesthetists and shared care doctors
Good news! If you are an anaesthetist or shared care doctor, you will now have your patients automatically appear in your Patient List (along with all of their results), removing the need to search for that patient and “break-glass” to view their information.
These patients will now appear by default in your List if you are listed against a patient:
- in a theatre booking as the anaesthetists or assistant surgeon; or
- as a secondary or ‘shared care’ clinician in the PAS.
You can use the Details, Results and Contacts tabs to view detailed patient information. 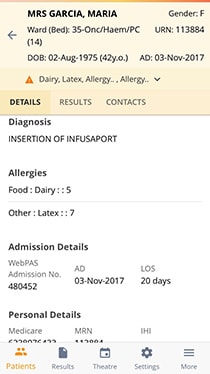
Patient results
This screen allows you to view the patient's pathology and radiology results for the record you are in. See results heading below for more information.
Please note: pathology and radiology results will display only for those results ordered during a patient's stay. This app does not update the pathology and radiology systems that you currently use to view results.
Contacts
The Contacts menu item displays patient content information including:
- Patient's phone number and address
- Patient's GP details
You can make direct calls from the app by selecting the phone icon next to the contact number.
The Results icon provides you with a summarised view of all results ordered during the patient’s stay for all patients assigned to you. The screen defaults to display unread results with additional filters to display abnormal, urgent, read or all results. See our FAQs for the list of current providers.

Any new results will be indicated on the Results icon. Notifications for results are only flagged within the app.
Results are defaulted to 7 days. This can be changed by using the filter button, which is accessible by scrolling to the right of the results screen menu.
![]()
Pathology results are listed by in reverse chronological order. Abnormal results are flagged with the ! icon.
Results can be filtered and customised by:
- time period
- order type
- test type
- test group
- test
- status
Acknowledging a patient result
To acknowledge a result drag the acknowledge slider at the bottom of the screen to acknowledge viewing the result.
Results that have been viewed display with a grey background, results that have not been viewed have a white background.

Please note: this app does not update the pathology and radiology systems that you currently use to view results.
Result trend viewer
Want to view all of a patient’s test results in a single table to quickly identify trends and take action?
Select a patient with some results from your List and go to Results.

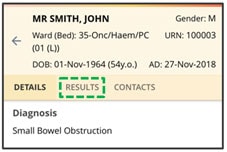
By default, your patient’s results will show as individual result cards (like previous versions) under the tab ‘By Order’. However, you now have a new option ‘By Trend’; select this to enter the trend view.

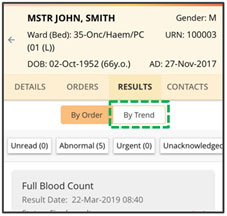
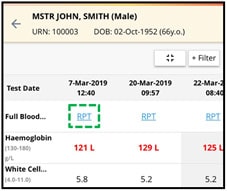
You will now see all of your patient’s results in the table, which will open with the far-right column visible (which contains the most recent results). You can also select the full-screen button to maximise the table.

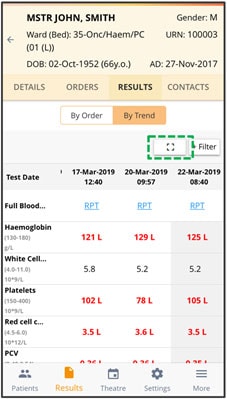
You will also find “RPT” links in each column which, when selected, will take you to the full result.
Bulk Edit Results
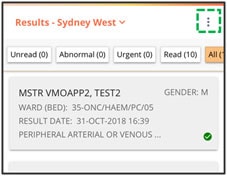
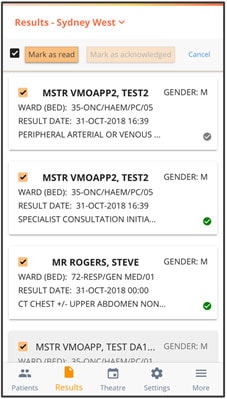
In the Results Inbox, you can now quick-select multiple results and mark them as read and/or acknowledged, rather than doing this on an individual result basis.
To use this feature, open the action menu in the Results Inbox (3 dots in the top right of the screen) and select ‘Actions’; you will now be able to quickly manage your results.
Result Card Indicators
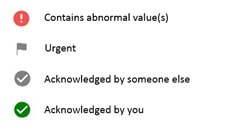
We have introduced some new icons on result cards to help you manage your results.
Here is an overview of what each icon means:
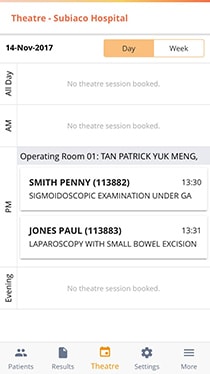
The Theatre menu item displays patient bookings listed in various sessions (AM, PM, evening and all day).
Theatre booking data is refreshed every five minutes for bookings within the next 7 days and hourly for bookings between 7 and 28 days.
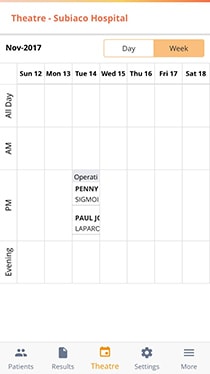
Bookings are displayed for a day by default with the option to view the bookings for the whole week.
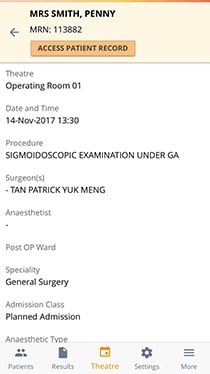
When you look at the daily view of theatre bookings you can see patient details, procedure and anaesthetist.
Anaesthetists can use this view to directly access patient records that they are assigned to.
The Settings menu item allows you to view application details.
How to reset your PIN
- Click the Settings icon
- Select change PIN code
- Follow the prompts on your phone to reset your PIN
Notifications for test results and other items within the app are not available outside of the app (i.e. they are not shown on your phone's home screen).
Ability to receive in-app notices like this one. These will appear each time you log-in unless you select “Don’t show me this notice again” directly below; when this is selected, you can still go and revisit notices by going to the “More” section of the app from the bottom navigation bar.
To log out:
- Select the More icon
- Log out of the app. Note: the app will automatically time out after 10 minutes of inactivity.
If you do not know your user name or St John of God Health Care password, or for general troubleshooting relating to the app please phone IT Service Desk on 1300 006 800 (Monday to Friday 8.00am to 5.30pm).
For which hospitals can I see patient data?
Subiaco, Murdoch, Mt Lawley, Ballarat, Bendigo, Berwick and Geelong
Which pathology and radiology providers can I see test results for?
Clinical Labs
SKG
I-MED Radiology
Bendigo Radiology
Lake Imaging
Which radiology providers can I see test images for?
SKG
Can I use the app on my desktop computer?
No. The app is designed for your mobile phone or tablet so you can access patient information when you need it at your practice, on the wards, in theatre or even at home.
What devices are certified for support with this app?
Any phone or tablet with:
Android 6.0 and up
iPhone iOS 12.1 or later
iPad iPadOS 12.1 or later
iPod Touch iOS 12.1 or later
Mac macOS 11.0 or later and a Mac with Apple M1 chip or later
NB. Other devices and Operating System's not listed here may also be compatible.
Can I logon from multiple devices?
Yes, however please note that you will be automatically logged out after 10 minutes of inactivity.
How is patient data protected?
Only doctors who are accredited specialists at St John of God Health Care hospitals, can access the app. All patient information is managed in line with our privacy policy, which is available online.
